Friday 10 May 2013

AutoCAD Civil 3d Setup pt 2

How do I start AutoCAD and Civil 3d?

Find your icon for Civil 3d or AutoCAD METRIC. I can`t stress this enough. We're in Ontario and the roads are designed in metric units. 

I`ve had countless experiences where someone puts in 38.0 hrs of work into a very pretty drawing only to find out that it was drawn using an Imperial template! If the units are wrong then it`s rework. As a consultant, rework is bad. It means time taken away from your budget so don't make this critical mistake. You'll later see why an Imperial template will hurt you and just cause headaches.

As an extra precaution, I recommend deleting the Imperial icon from your desktop. Don't worry, you'll still have access to Imperial Civil 3d and AutoCAD through the Start Menu. For all you railway designers, just disregard this step.

Once you get AutoCAD Civil 3d started you should get something like this:


Ah yes, the default screen! If you see this then you probably never touched Civil 3d and AutoCAD.

AutoCAD Civil 3d Setup: Get those handy menu bar`s back!

I`ve been working with AutoCAD since 2000. I`m used to the command bars around my work window.  The ribbons are fantastic but I like the menu command for familiarity. Plus, it doesn`t take up a whole lot of space and I have some personal menu tools that I love using and would like to keep as a menu. More to come later with respect to customizing menu tools.

To get your menu bar, follow these steps:
  • Look for the Quick Access Bar and the little black arrow at the Top Left Corner
  • Click on the black arrow and select Show Menu Bar
  • Hurray! Menu Bars!
Again, I love the ribbons but the menu bars just make it feel like home.


AutoCAD Civil 3d Setup: Let`s get those quick icons back!

Quick icons are another helpful item you want to have hanging around.  Essentially they help with the drafting and 2-D controls.  The quick icons will  work in harmony with the wonderful Civil 3d ribbons. I highly recommend keeping the work space as Civil 3d. Bring in the icons for AutoCAD 2-D drafting purposes will save you from switching back and forth between workspace settings.

To setup the quick icons:

  • Point your mouse to the greyspace just above the default Civil 3d icons to your far right 
  • Right Click and expand the AutoCAD icon menu list


  • You'll see a whole bunch of different icons you can choose from. I highly recommend the following:
    • Dimensions
    • Draworder
    • Layers
    • Layers II
    • Measurement Tools
    • Modify
    • Properties
    • Styles
Place the icon bars and dock them just underneath your Ribbon. Here's my setup if you need somewhere to start.


I don't want to dictate your setup. Feel free to add or delete the icons as necessary.  

As a Transportation Designer I find this setup the most ergonomic way of  doing what I need to do. It gives me flexibility, quickly tells me what layer I'm drawing on, what style of text and dimension style I'm currently using. Most importantly, it gives me complete control over my layers. Something that I can't do with the default Civil 3d Ribbons.

AutoCAD Civil 3d Setup: Control the way you draw and must know key commands


The great advantage about Autocad is the key commands. The key commands are intuitive and quick. As a side joke, I feel that if you're good a computer games, you'll get good in AutoCAD quick cause the key command and interaction of the mouse are very similar in nature.

Here are the must know key commands:

  • L- Line
  • Ctrl+L-Ortho On or Off
  • O-Offset
  • P-Pan
  • C-Circle
  • A-Arc
  • F-Fillet
  • T-Text
  • TR-Trim
  • E-Erase
  • Z-Zoom
  • Spacebar & Enter
If you memorized these key commands, congratulations! you can pretty much crunch out any 2-D drawing!

Next, let's look at the mouse.  Do not skip this part unless you like wasting time.

I use a 2-Button mouse with a scroll that acts as a middle button. By default, if you click that middle button it acts as your pan. Some people love it and very few hate it. I'm one of those very few that hate it and you should too.

I'll tell you why. When designing, you'll need to control your SNAPS more than you'll need to pan. If I need to get somewhere in my drawing I usually navigate by scrolling in and out (i.e zoom out and zoom in). If I must pan, I use my keyboard command P and pan my heart out.

You maybe thinking that you can simply use OSNAPS by pressing F9 to control your SNAPS. You're heading towards a world of pain, inefficiency and frustration. Once you work with xrefs and other people's drawings, you'll see why OSNAPS just suck and are a waste of time.

I set my middle button as my Snap Options. I feel out of control using OSNAPS so I always turn it off. To setup my SNAP options I use the command line: MBUTTONPAN.

By Default MBUTTONPAN shows up in your command line with a value of 1. I change it to 0 to turn off pan by middle button. Once you set this, it's done. You'll never need to change it again.

This is what your SNAP options look like:


Like the Keyboard command you should memorize your shortcut SNAP keys as well:

  • E-Endpoint
  • I - Intersection
  • A-Apparent Intersection
  • P-Perpendicular
  • M-Midpoint
  • T-Tangent
  • R-Nearest
  • Q-Quadrant 
  • N-Node
  • S-Insert
There's quite a few options, but the ones I just mentioned are used ALL the time.

If you just can't live without the middle button as your pan but you love the idea of SNAP options then you can bring it up by:
  • Hold CTRL+SHIFT and Right Click
Again, the middle mouse button is much quicker than CTRL+SHIFT and Right Click. Try it over a few times and see which one you like but by all means, turn off your OSNAPS!

Saturday 20 April 2013

AutoCAD Civil 3d Setup: Let`s save your eyes!


Your eyes are important and I hate the default colours. Working with a white or washed out black background will strain your eyes. I have no clue why Autodesk chose them as the default colours. As a designer you need your eyes and you'll be staring at the screen for long periods of time. 

Lets personalize our display settings. 

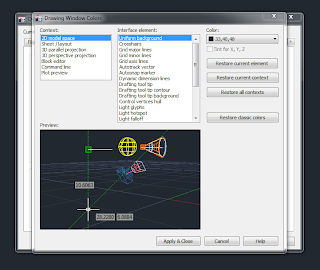
  • Type OPTIONS in the command line
  • Go to the DISPLAY Tab:
  • Click on Colours


  • Note the Context Window.  The two items that you`re most interested in is the 2D model space and Sheet/Layout. In the Interface Element keep the Uniform Background highlighted and then pull down Colour and highlight BLACK.
  • Repeat the steps for the Sheet/Layout in your Context Window and choose Colour BLACK.
  • Apply and close the windows
  • Go to your Model and Sheet Tabs located at the bottom left corner and check that your model background and sheet/layout background are now showing a black background.
  • Thank me later for saving your eyes
Note that you have alot of options to personalize here. You can personalize the colour of your crosshairs, block editor window, even the background of your command line. Explore the options and personalize your work settings. The rest of the default colours should be fine.

AutoCAD and Civil 3D


What is the difference/relationship between AutoCAD and Civil 3d?

AutoCAD has been around for ages. It's the base platform for Computer Aided Design (CAD). AutoCAD is an excellent way to show information in a 2-D format. You can draw in 3-D but in the Transportation Consulting world it's hardly used at this moment. 

Civil 3d is an 'add on' to AutoCAD much like how Land Desktop Developer is (or was).  Civil 3d is a fantastic analytical tool to help designers and engineers make critical design decisions. It also minimizes the guesswork and interpolation by producing accurate results quickly and efficiently in REAL TIME.

Let's put it this way. AutoCAD is your Motor and Civil 3d is the Turbo Charger which you attach to the motor. There are plenty of field specific add-ons offered by Autodesk but as a road or land developer, 99% of your needs will be answered through Civil 3d.

Friday 19 April 2013

Recommended System Requirements: Where Should I be spending the money?

Like any good CAD ninja, I wanted to be able to run Civil 3d at home.  My laptop was well over 5 years old and could barely run the 2-D functions.

It was time to get a new machine.  I looked at the System Requirements for 2011 Civil 3d on the Autodesk website: 


For 64-Bit AutoCAD Civil 3D 2011
·         Windows 7 Enterprise, Ultimate, Professional, or Home Premium (64-bit); Windows Vista Enterprise, Business, Ultimate (SP1 or SP2, 64-bit); or Windows XP Professional x64 Edition (SP2, 64-bit).
·         AMD Athlon 64, AMD Opteron, Intel® Xeon with Intel® EM64T support, Intel® Pentium® 4 with Intel EM64T support.
·         4 GB RAM minimum required, 8 GB RAM minimum recommended. 
·         7 GB disk space with 2 GB free after installation.
·         1,280 x 1,024 true color video display adapter (true color) 128 MB or greater, Pixel Shader 3.0 or greater, Direct3D®-capable workstation-class graphics card. 1,600 x 1,200 or greater recommended. Multiple monitors are supported.
·         Microsoft® Internet Explorer® 7.0 or later.
·         DVD drive.

Keep in mind that the System Requirements doesn’t mean the best performance. Getting a computer with the exact spec’s above won’t mean you’ll cut through your drawings like a true ninja.

Before you go nuts in spec’ing out your system, let’s ask yourself three key questions.

1.   What’s your budget?
2.   How large are your projects? Are you building Corridors over 4 km in length or a subdivision road with multiple intersecting roads? How about services such as Storm Sewers, Sanitary and Watermains? Or are you do simple road widening for a commercial development or putting together a few figures here and there?
3.   Do you plan to use the computer for other purposes such as games?

Unfortunately for me, I wanted a fairly high end computers because my projects were stupid big and complicated.

I had a modest budget I did a lot of research of where I should be putting my money. Here’s what I learned.

·        CPU speed is king. My personal preference is to stick with an Intel chip (sorry AMD fans!) I wanted a computer with a minimum i5 processor but my preference is an i7. Having an i5 processor is sufficient to cut through the small projects but you`ll notice considerable slow down for larger projects. There’s debate whether Civil 3d utilizes multiple processors and the simple answer looks like no, however the CPU speed does matter!
·        RAM. The guys over at Being Civil have a great article on RAM and Civil 3d. http://beingcivil.typepad.com/my_weblog/memory/
They recommended 8 GB as the sweet spot. I can`t argue with that. They have great proof. I on the other hand like to run the odd game here and there so I set out for at least 12 GB of RAM.  Besides, RAM is fairly cheap!
·        Solid State Drives. The biggest bottle neck to any system is the hard drive. Introducing the Solid State Drive and the 500 MB/s Read Speeds!  Currently Samsung makes the best SSDs as well as Crucial. No need to go for the Samsung Pro unless you want bragging rights. For capacity, I would go for a minimum of 250 GB SSD to run Civil 3d with the work files located on the SSD. Throw all your music and photos to a regular HDD or network and keep your SSD relatively clean with Windows, Civil 3d and other programs and games which requires speed.
·        Video Cards Schmido Cards. Notice that Civil 3d doesn’t really place an emphasis on Video Cards anymore. 128mb is nothing these days. Don’t go overboard with the Video Cards and good news for gamers, gamer cards are just fine for Civil 3d.  Don’t buy a super duper Nvidia Quadro video card unless you’re doing some serious 3D work on top of Civil 3d. Here’s a great youtube link showing what an i5 with integrated graphics (i.e no video card at all! Just pure CPU power!) and SSD can do with AutoCAD: http://www.youtube.com/watch?v=FUwNm9_2et0

The debate continues whether 64-Bit Civil 3d is better than 32-Bit Civil 3d.  The truth is they are the same, however without some computer skills, you can't utilize more than 4 GB of RAM with a 32-Bit installation of Windows. To make life easier, I highly recommend going with a 64-Bit installation of Windows because you'll need more than 4 GB of RAM to run Civil 3d.  

With respect to Windows, the computer I ended up buying came with Windows 8.  I was in for a nasty surprise. Civil 3d 2011 is unstable with Windows 8. How frustrating is that?


So make sure your new computer is installed with Windows 7 or XP.

Best of luck! And remember, kijiji is your friend. There are great deals on dual monitors and computers out there. Do your due diligence and research the specs and brands.

Practice makes perfect

Being a student definitely has it's advantages. Cheap beer nights at the pub, student discount cards and discounted bus fare. Best of all, Autodesk allows free downloads for students! Take full advantage of this fantastic opportunity to turn yourself from a pirate to CAD ninja. You can watch as many youtube videos as you want but you'll never retain the knowledge till you practice. So practice lots and don't sweat about the RCMP knocking on your door.

http://students.autodesk.com/?nd=download_center

As a Transportation Designer, you'll only need Civil 3d. I'll show you how you can setup the environment so all your favourite AutoCAD commands are a click away.

Introductions

Hello World! Welcome to my humble blog. Here you'll learn tips and tricks as well as core functions for AutoCad and Civil 3d to get you started as a Transportation Designer. Also I'll speak to must know Geometric Design practices in Ontario and how it ties in with the program.

Enjoy your stay!